
Calculate tools
Overview of Tools
| Icon | Descriptions |
 |
Calculate the difference between a raster layer and a reference |
 |
Calculate the volume difference between bathymetry layers or against a reference level within defined polygon areas. |
Calculate Raster
The Calculate Raster tool allows calculations to be made, either between two overlapping bathymetry layers, or between one bathymetry layer and a fixed value. This has many useful purposes, including allowing users to compare original plans with the reality on the seabed.
When a calculation is made, a new layer is created.
All the basic arithmetic operations (add/subtract/divide/multiply/average) are supported.
Options
| Option | Description |
|---|---|
| Mode | Layers Makes mathematical calculations between two bathymetry layers. Fixed value Makes mathematical calculations between a bathymetry layer and a fixed value. |
| Bathymetry layer A | The first bathymetry layer. |
| Bathymetry layer B | If mode = “layers" this is the second layer. |
| Fixed value | If mode = “fixed value" then this is the second parameter in the calculation operation. |
| Operation | Add A + <layer B/value> Subtract A - <layer B/value> Divide A / <layer B/value> Multiply A * <layer B/value> Average (A + <layer B/value>) / 2 |
| Layer | The name of the layer to be created. |
| Personal layer | Only possible for those with a contributor role. Select “Yes" visible to you. |
| Layer group | Place the new layer in this layer group. |
Instruction Video
Calculate Volume
The Calculate Volume tool measures the volume difference between bathymetry layers or against a reference level within defined polygon areas. This is commonly used for monitoring scour protection around monopiles and determining material volume/dredging requirements. The tool outputs into PDF or CSV format.
Quick Start
Prerequisites:
- At least one bathymetry layer loaded in your project.
- One or more polygon features defining calculation area(s).
The Calculations menu is only available when you have at least one bathymetry layer in your project.
Modes:
| Mode | Use When | Example |
| Reference Layer | Comparing two bathymetry surveys to detect changes over time | Comparing pre-installation seabed scan with current conditions around monopile foundation |
| Reference Level | Measuring volume relative to a fixed elevation | Calculating rock dump volume from top surface to 10 meters below the peak |
Example: reference layer
Example: reference level
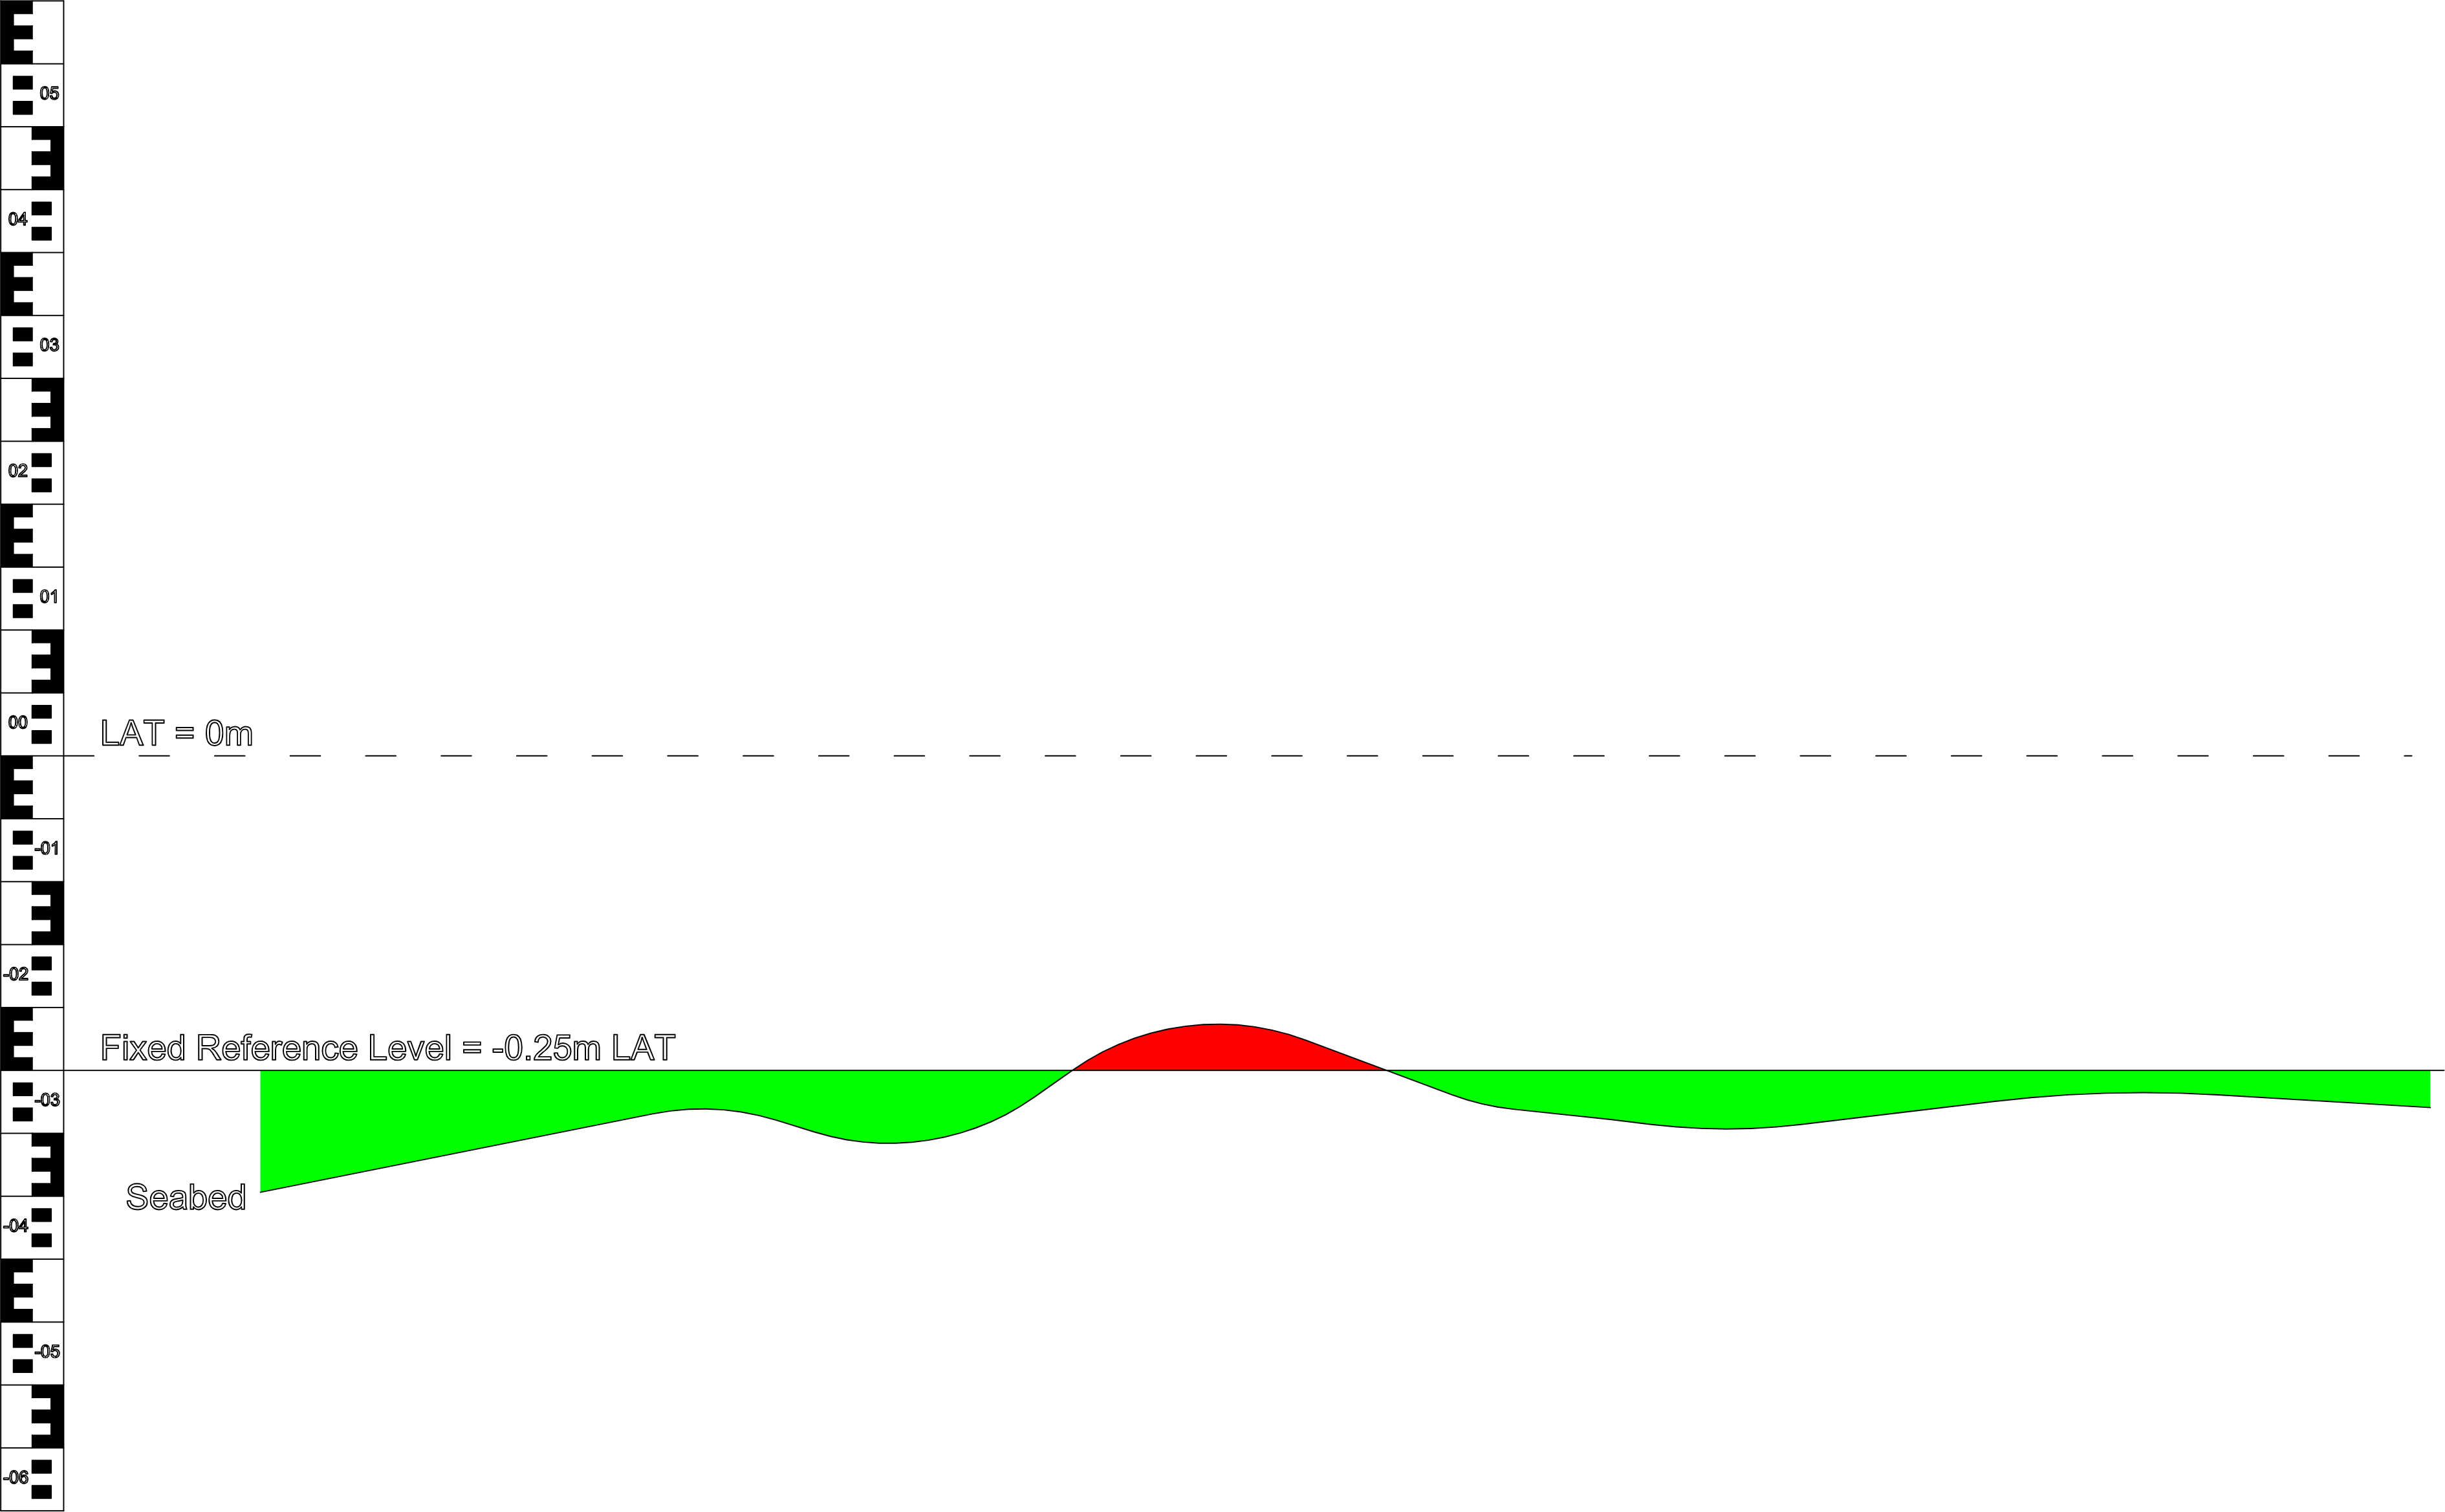
Red = Volume inside polygon
Green = Volume outside polygon
Basic workflow:
- Select a model layer (the bathymetry layer to analyze)
- Choose calculation mode (Layers or Reference Level)
- Select reference layer (Layers mode) or enter reference level in meters (Reference Level mode)
- Select polygon layer containing your areas of interest
- Choose one or more polygons to calculate volume for
- Click Export to CSV or Export to PDF
Layer terminology
| Layer | How to use |
| Model Layer | This is the baseline to which you will be comparing a design or DTM (digital terrain model). |
| Reference layer |
This is normally the design that you will be comparing to the model layer (baseline). |
| Reference level |
The depth level in relation to LAT (lowest astronomical tide) that you will compare to the model layer (baseline). |
Understanding Results:
The volume calculation produces the following metrics for each selected polygon:
| Metric | Description |
|---|---|
| Model Name | The model layer that is being used to calculate volume for. |
| Reference Name | The layer that is being used as the reference for the calculation. |
| Polygon Name | The area for which volume will be calculated. |
| Volume Above Reference (m³) | Volume where the model layer is higher than the reference (material addition or accumulation) |
| Volume Below Reference (m³) | Volume where the model layer is lower than the reference (material loss or erosion) |
| Volume Difference (m³) | Net volume change (Volume Above minus Volume Below). Positive values indicate net accumulation; negative values indicate net loss. |
| Area Above Reference (m²) | Surface area where the model layer is above the reference |
| Area Below Reference (m²) | Surface area where the model layer is below the reference |
| Polygon Area (m²) | Combined area of all calculated regions (Area Above plus Area Below) |
| Area without Data (m²) | Area of the model layer that falls outside the polygon being used to calculate volume. |
| Area without Reference (m²) | Area of the reference layer that falls outside the polygon being used to calculate volume. |
| Average Layer Thickness (m) | Average depth of change across the total area (calculated as Volume Difference divided by Total Area) |
All values are rounded to two decimal places in the output.
Tips and Best Practices
- Plan your polygon areas carefully: Create polygon layers that match your analysis needs before starting calculations. Well-defined areas of interest will make your workflow more efficient.
- Use meaningful layer names: Name your bathymetry layers with dates or survey identifiers to easily track which data you're comparing.
- Monitor calculation time: Calculations on large areas or high-resolution data may take some time. The tool displays a loading indicator during processing.
- Export both formats: Consider exporting both CSV and PDF formats—CSV for detailed analysis and PDF for documentation and reporting.
- Interpret Volume Difference carefully: Positive values indicate net accumulation; negative values indicate net loss. This metric is particularly useful for quick assessment of material changes.
- Use map highlighting: Selected polygons are highlighted on the map and automatically centered in the view, making it easy to verify you're analyzing the correct areas.
- Keep data organized: Maintain a clear naming convention for your surveys and regularly export calculation results to track changes over time.
Detailed guide
The Calculate Volume tool enables you to measure volumetric differences in bathymetric data (bathymetric layers) within specified areas (polygons). This functionality is essential for monitoring seafloor changes, particularly for offshore wind farm applications where scour protection monitoring around monopile foundations is critical.
The tool calculates volumes in cubic meters and areas in square meters, providing detailed metrics including volume above, volume below, and net volume difference for each selected polygon.
Prerequisites
Before using the Calculate Volume tool, ensure you have:
- Bathymetry layers: At least one bathymetry layer loaded in your project. To Layers mode, you need at least two compatible bathymetry layers.
- Polygon layer: A feature layer containing polygons or closed line strings that define the areas where you want to calculate volumes.
- Compatible projections: When using Layers mode, both bathymetry layers must use the same coordinate reference system (projection).
- Overlapping data: The model layer and reference (layer or polygons) must have overlapping geographic extents.
The Calculations menu is only available when you have at least one bathymetry layer in your project.
Configuration
1. Mode selection
| Mode | When to use? |
| Layers Mode |
Use this mode when you want to compare two bathymetric surveys to measure changes over time. This is ideal for:
|
| Reference Level Mode |
Use this mode when you want to calculate volume relative to a fixed elevation value. This is useful for:
|
2. Model Layer Selection
The model layer is the primary bathymetry layer you want to analyze. This is typically your most recent survey or the layer representing current conditions.
Select your model layer from the Model layer dropdown menu. Only bathymetry layers that are ready for calculations will be available in this list.
Important: Once you select a model layer, the tool automatically filters the available reference layers and polygon layers to show only those that are compatible (matching projection and overlapping geographic extent).
3. Reference Selection
The reference defines what your model layer will be compared against. The reference selection depends on your chosen mode:
For Layers Mode:
Select a reference layer from the dropdown. This should be your baseline bathymetry survey, typically an earlier survey that you want to compare against.
Only bathymetry layers that share the same projection as your model layer and have overlapping coverage will appear in this list.
For Reference Level Mode:
Enter a reference level value in meters. This value represents the elevation you want to use as your comparison baseline.
- Positive values: Measure upward from the seabed (e.g., +2.0 meters above the seabed surface)
- Negative values: Measure downward from the seabed (e.g., -10.0 meters below the seabed surface)
Example: For a scour protection mound where you want to calculate the volume from the top down to 10 meters below the peak, you would enter -10.0 as your reference level.
4. Polygon Layer Selection
Select the feature layer that contains the polygons defining your areas of interest. These polygons specify the area for which the volume calculations will be performed.
Only layers containing polygon or closed line string features that overlap with your model layer will be available in the Polygon layer dropdown.
5. Polygon Selection
After selecting a polygon layer, choose which specific polygons you want to include in the calculation:
- Click the Polygons dropdown to see all available polygons from the selected layer
- Select one or more polygons (multi-select is supported)
- Use the Select All option to quickly select all available polygons
Selected polygons will be highlighted on the map, and the map view will automatically zoom to show all selected areas.
do we need to explain what could be the problem if they do not see any polygons (again)? I'm assuming they did not read above.
Exporting the results
The Calculate Volume tool offers two export formats:
CSV Export
Exports calculation results as a comma-separated values file suitable for:
- Import into spreadsheet applications (Excel, Google Sheets)
- Further data analysis and processing
- Integration with other software tools
- Creating custom reports or visualizations
PDF Export
Generates a PDF report with one page per selected polygon, each containing:
- A table with all calculation metrics for that polygon
- A map view centered on the polygon area with bathymetry data
The PDF format is ideal for documentation, presentations, and sharing results with stakeholders who don't need to manipulate the data.
To export:
- Click the main export button to use the currently selected format (default is CSV)
- Or click the dropdown arrow to choose between CSV and PDF formats
- The file will be automatically downloaded with a filename based on your model layer name
Common Use Cases
Scour Protection Monitoring
Scenario: You need to monitor the scour protection around monopile foundations and determine if additional material needs to be placed.
Approach:
- Use Layers mode to compare your recent survey (model layer) against the as-built survey or previous monitoring survey (reference layer).
- Select polygons around each monopile location.
- Export results to identify locations with negative volume difference (material loss) that may require remediation.
Rock Dump Volume Estimation
Scenario: You need to calculate the volume of rock material in a scour protection mound from the top surface down to 10 meters depth.
Approach:
- Use Reference Level mode with your current bathymetry survey as the model layer
- Enter -10.0 as the reference level (10 meters below the surface)
- Select the polygon encompassing the rock dump area
- The Volume Above value will represent the material volume within that depth range
Change Detection Analysis
Scenario: You need to assess changes across multiple locations between two survey periods.
Approach:
- Use Layers mode with your newer survey as the model layer and older survey as the reference layer
- Select all polygons of interest using the Select All option
- Export to CSV for analysis in spreadsheet software
- Sort by Volume Difference to quickly identify areas with the greatest changes
Troubleshooting
Layer options are limited after selecting model layer
This is expected behavior. The tool automatically filters available layers to show only those that are compatible with your selected model layer (same projection for reference layers, overlapping extent for polygon layers).
Error: Bathymetry layer(s) are missing the required data file
This error occurs when one or more selected bathymetry layers don't have the necessary processed data for calculations. Ensure that your bathymetry layers have been fully processed before attempting volume calculations.
Unexpected or incorrect results
If results seem incorrect:
- Verify that both layers (in Layers mode) use the same coordinate reference system
- Confirm that your polygons actually overlap the bathymetry data coverage area
- Check the vertical reference system of your bathymetry layers
- In Reference Level mode, verify you've entered the reference level with the correct sign (positive or negative)