# Project and Layer Access

## Introduction


---

A user can access a GRID*it* project after an admin registers them and assigns them a role for one or more projects. Once this is done, the user is granted project-level access. Depending on the assigned project role, the user may be able to view, edit, or create data within the project.

Project access can be overridden for each individual layer within a project (layer access may be managed independently). Project-level access defines the user’s default permissions within the project, while layer-level access can be used to restrict who can see a specific layer or elevate who may modify or manage that layer.

<div drawio-diagram="139"><img src="https://wiki.app.gridit.nl/uploads/images/drawio/2026-05/drawing-3-1777621542.png" alt=""/></div>

## How access works

---

Access can be granted on the project-level OR the layer-level. Project-level is the default access level and is applied **unless** access is defined on the layer-level. In practice, assigning a user a project role, either Reader or Contributor (see user roles below), the user will have access to **all** layers in the project according to their role. If specific layer-level access has been configured, those layer permissions override the project-level access for that layer only. If you need to restrict or elevate access to a specific layer to a user or group, you need to do so on a **per layer basis**. Layer-level access can be granted to a user or a group. Periplus recommends using groups for layer-level access management.

<p class="callout info">After a layer is created, the access can be adjusted (this was not possible before). The layer author can choose to provide access to 1) everyone in the project as define by project role OR 2) to restrict the layer to some users or groups (as defined in the layer properties)</p>

<p class="callout warning">Setting up more granular (layer-level) access is powerful and needs to be thoroughly thought out. Please read [layer level access](#bkmrk-layer-level-access) below **thoroughly** to avoid <span style="text-decoration: underline;">locking users out from layers</span>. If you are not sure or have questions, please email <support@gridit.nl></p>

### Project level access

When a user is granted access to a project, they are granted access to all layers, based on the project role assigned to them. Project-level access can only be given to a user (not a group). This project-role gives provisional access to all layers in the project until this access is overridden for specific layer(s). When layer-level access is defined, the layer settings determine the user’s permissions for that specific layer. Project-level access remains the same in 2026.1 release as in all prior releases. Additionally, project-level access determines who can create a layer.

Users can check their assigned project role(s) in the upper right corner of the GRID*it* interface, along with the specific project(s) they have access to.

<p class="callout info">Permission to add a new layer within a project is given via a project role (contributor or admin).</p>

<details id="bkmrk-project-level-roles-"><summary>GRIDit user roles</summary>

##### Organization Admin

- Can manage organization settings.
- Can manage users/groups.
- Can manage projects.
- Full access to data (can also recover restricted layers).

##### Project Admin

- Can create, update, read, and delete all project-related data (can also recover restricted layers).
- Can manage projects.

##### Project Contributor

- Can create, update, read, and delete all project-related data (unless specified otherwise on the layer-level).
- Cannot manage users or licenses.

##### Project Reader

- Read-only access to project data (unless specified otherwise on the layer-level).
- Can create, update, read, and delete personal layers and settings where applicable.

An overview of the permissions per role:

<table border="1" id="bkmrk-%C2%A0-organization-admin" style="border-collapse: collapse; width: 94.4756%; height: 1127.9px;"><colgroup><col style="width: 30.8336%;"></col><col style="width: 19.7283%;"></col><col style="width: 16.0695%;"></col><col style="width: 14.3722%;"></col><col style="width: 19.0751%;"></col></colgroup><thead><tr style="height: 30.125px;"><th style="height: 30.125px;"> </th><th style="height: 30.125px;">**Organization Admin**</th><th style="height: 30.125px;">**Project Admin**</th><th style="height: 30.125px;">**Contributor**</th><td class="align-center" style="height: 30.125px;">**Reader**</td></tr></thead><tbody><tr style="height: 30.125px;"><td style="height: 30.125px;">Add projects</td><td class="align-center" style="height: 30.125px;">**✔**</td><td class="align-center" style="height: 30.125px;">**✖**</td><td class="align-center" style="height: 30.125px;">**✖**</td><td class="align-center" style="height: 30.125px;">**✖**</td></tr><tr style="height: 30.125px;"><td style="height: 30.125px;">Clone projects</td><td class="align-center" style="height: 30.125px;">**✔**</td><td class="align-center" style="height: 30.125px;">**✖**</td><td class="align-center" style="height: 30.125px;">**✖**</td><td class="align-center" style="height: 30.125px;">**✖**</td></tr><tr style="height: 30.125px;"><td style="height: 30.125px;">Add new users</td><td class="align-center" style="height: 30.125px;">**✔**</td><td class="align-center" style="height: 30.125px;">**✖**</td><td class="align-center" style="height: 30.125px;">**✖**</td><td class="align-center" style="height: 30.125px;">**✖**</td></tr><tr style="height: 46.25px;"><td style="height: 46.25px;">Link layer to another project

(requires access to both projects)

</td><td class="align-center" style="height: 46.25px;">**✔**</td><td class="align-center" style="height: 46.25px;">**✔**</td><td class="align-center" style="height: 46.25px;">**✔**</td><td class="align-center" style="height: 46.25px;">**✖**</td></tr><tr style="height: 30.125px;"><td style="height: 30.125px;">Add files to project</td><td class="align-center" style="height: 30.125px;">**✔**</td><td class="align-center" style="height: 30.125px;">**✔**</td><td class="align-center" style="height: 30.125px;">**✔**</td><td class="align-center" style="height: 30.125px;">**✖**</td></tr><tr style="height: 63.6875px;"><td style="height: 63.6875px;">Mark a layer as a personal layer</td><td class="align-center" style="height: 63.6875px;">**✔**</td><td class="align-center" style="height: 63.6875px;">**✔**</td><td class="align-center" style="height: 63.6875px;">**✔**</td><td class="align-center" style="height: 63.6875px;">**✖**

all added data are personal layers only

</td></tr><tr style="height: 30.125px;"><td style="height: 30.125px;">Layer editing</td><td class="align-center" style="height: 30.125px;">**✔**</td><td class="align-center" style="height: 30.125px;">**✔**</td><td class="align-center" style="height: 30.125px;">**✔**</td><td class="align-center" style="height: 30.125px;">**✖**</td></tr><tr style="height: 30.125px;"><td style="height: 30.125px;">Layer management</td><td class="align-center" style="height: 30.125px;">**✔**</td><td class="align-center" style="height: 30.125px;">**✔**</td><td class="align-center" style="height: 30.125px;">**✔**</td><td class="align-center" style="height: 30.125px;">**✖**</td></tr><tr style="height: 30.125px;"><td style="height: 30.125px;">Data portal</td><td class="align-center" style="height: 30.125px;">**✔**</td><td class="align-center" style="height: 30.125px;">**✔**</td><td class="align-center" style="height: 30.125px;">**✔**</td><td class="align-center" style="height: 30.125px;">**✖**</td></tr><tr style="height: 30.125px;"><td style="height: 30.125px;">Edit Attributes</td><td class="align-center" style="height: 30.125px;">**✔**</td><td class="align-center" style="height: 30.125px;">**✔**</td><td class="align-center" style="height: 30.125px;">**✔**</td><td class="align-center" style="height: 30.125px;">**✖**</td></tr><tr style="height: 30.125px;"><td style="height: 30.125px;">Export data from layers</td><td class="align-center" style="height: 30.125px;">**✔**</td><td class="align-center" style="height: 30.125px;">**✔**</td><td class="align-center" style="height: 30.125px;">**✔**</td><td class="align-center" style="height: 30.125px;">**✔**</td></tr><tr style="height: 30.125px;"><td style="height: 30.125px;">Export files from layers</td><td class="align-center" style="height: 30.125px;">**✔**</td><td class="align-center" style="height: 30.125px;">**✔**</td><td class="align-center" style="height: 30.125px;">**✔**</td><td class="align-center" style="height: 30.125px;">**✔**</td></tr><tr style="height: 46.25px;"><td style="height: 46.25px;">Add WMS/WFS layers</td><td class="align-center" style="height: 46.25px;">**✔**</td><td class="align-center" style="height: 46.25px;">**✔**</td><td class="align-center" style="height: 46.25px;">**✔**</td><td class="align-center" style="height: 46.25px;">**✔**

personal layers only

</td></tr><tr style="height: 46.25px;"><td style="height: 46.25px;">Add Vector data</td><td class="align-center" style="height: 46.25px;">**✔**</td><td class="align-center" style="height: 46.25px;">**✔**</td><td class="align-center" style="height: 46.25px;">**✔**</td><td class="align-center" style="height: 46.25px;">**✔**

personal layers only

</td></tr><tr style="height: 46.25px;"><td style="height: 46.25px;">Add Raster data</td><td class="align-center" style="height: 46.25px;">**✔**</td><td class="align-center" style="height: 46.25px;">**✔**</td><td class="align-center" style="height: 46.25px;">**✔**</td><td class="align-center" style="height: 46.25px;">**✔**

personal layers only

</td></tr><tr style="height: 46.25px;"><td style="height: 46.25px;">Manage themes</td><td class="align-center" style="height: 46.25px;">**✔**</td><td class="align-center" style="height: 46.25px;">**✔**</td><td class="align-center" style="height: 46.25px;">**✔**</td><td class="align-center" style="height: 46.25px;">**✔**

personal layers only

</td></tr><tr style="height: 46.25px;"><td style="height: 46.25px;">Theme Display options</td><td class="align-center" style="height: 46.25px;">**✔**</td><td class="align-center" style="height: 46.25px;">**✔**</td><td class="align-center" style="height: 46.25px;">**✔**</td><td class="align-center" style="height: 46.25px;">**✔**

personal layers only

</td></tr><tr style="height: 30.125px;"><td style="height: 30.125px;">Select Features</td><td class="align-center" style="height: 30.125px;">**✔**</td><td class="align-center" style="height: 30.125px;">**✔**</td><td class="align-center" style="height: 30.125px;">**✔**</td><td class="align-center" style="height: 30.125px;">**✔**</td></tr><tr style="height: 30.125px;"><td style="height: 30.125px;">Measure tools</td><td class="align-center" style="height: 30.125px;">**✔**</td><td class="align-center" style="height: 30.125px;">**✔**</td><td class="align-center" style="height: 30.125px;">**✔**</td><td class="align-center" style="height: 30.125px;">**✔**</td></tr><tr style="height: 30.125px;"><td style="height: 30.125px;">Burial (Difference) Assessment</td><td class="align-center" style="height: 30.125px;">**✔**</td><td class="align-center" style="height: 30.125px;">**✔**</td><td class="align-center" style="height: 30.125px;">**✔**</td><td class="align-center" style="height: 30.125px;">**✔**</td></tr><tr style="height: 30.125px;"><td style="height: 30.125px;">Profile tools</td><td class="align-center" style="height: 30.125px;">**✔**</td><td class="align-center" style="height: 30.125px;">**✔**</td><td class="align-center" style="height: 30.125px;">**✔**</td><td class="align-center" style="height: 30.125px;">**✔**</td></tr><tr style="height: 30.125px;"><td style="height: 30.125px;">Calculate Raster</td><td class="align-center" style="height: 30.125px;">**✔**</td><td class="align-center" style="height: 30.125px;">**✔**</td><td class="align-center" style="height: 30.125px;">**✔**</td><td class="align-center" style="height: 30.125px;">**✔**</td></tr><tr style="height: 30.125px;"><td style="height: 30.125px;">Markers</td><td class="align-center" style="height: 30.125px;">**✔**</td><td class="align-center" style="height: 30.125px;">**✔**</td><td class="align-center" style="height: 30.125px;">**✔**</td><td class="align-center" style="height: 30.125px;">**✔**</td></tr><tr style="height: 30.125px;"><td style="height: 30.125px;">Edit Waypoint Attribute table</td><td class="align-center" style="height: 30.125px;">**✔**</td><td class="align-center" style="height: 30.125px;">**✔**</td><td class="align-center" style="height: 30.125px;">**✔**</td><td class="align-center" style="height: 30.125px;">**✔**</td></tr><tr style="height: 30.125px;"><td style="height: 30.125px;">3D View</td><td class="align-center" style="height: 30.125px;">**✔**</td><td class="align-center" style="height: 30.125px;">**✔**</td><td class="align-center" style="height: 30.125px;">**✔**</td><td class="align-center" style="height: 30.125px;">**✔**</td></tr><tr style="height: 30.125px;"><td style="height: 30.125px;">Export map</td><td class="align-center" style="height: 30.125px;">**✔**</td><td class="align-center" style="height: 30.125px;">**✔**</td><td class="align-center" style="height: 30.125px;">**✔**</td><td class="align-center" style="height: 30.125px;">**✔**</td></tr><tr style="height: 30.125px;"><td style="height: 30.125px;">View Attribute table</td><td class="align-center" style="height: 30.125px;">**✔**</td><td class="align-center" style="height: 30.125px;">**✔**</td><td class="align-center" style="height: 30.125px;">**✔**</td><td class="align-center" style="height: 30.125px;">**✔**</td></tr><tr style="height: 30.125px;"><td style="height: 30.125px;">View project files</td><td class="align-center" style="height: 30.125px;">**✔**</td><td class="align-center" style="height: 30.125px;">**✔**</td><td class="align-center" style="height: 30.125px;">**✔**</td><td class="align-center" style="height: 30.125px;">**✔**</td></tr><tr style="height: 30.125px;"><td style="height: 30.125px;">Background maps</td><td class="align-center" style="height: 30.125px;">**✔**</td><td class="align-center" style="height: 30.125px;">**✔**</td><td class="align-center" style="height: 30.125px;">**✔**</td><td class="align-center" style="height: 30.125px;">**✔**</td></tr><tr style="height: 46.9167px;"><td style="height: 46.9167px;">External Service ENC The Netherlands</td><td class="align-center" style="height: 46.9167px;">**✔**</td><td class="align-center" style="height: 46.9167px;">**✔**</td><td class="align-center" style="height: 46.9167px;">**✔**</td><td class="align-center" style="height: 46.9167px;">**✔**</td></tr><tr style="height: 46.9167px;"><td style="height: 46.9167px;">External Service Global Open Sea Map</td><td class="align-center" style="height: 46.9167px;">**✔**</td><td class="align-center" style="height: 46.9167px;">**✔**</td><td class="align-center" style="height: 46.9167px;">**✔**</td><td class="align-center" style="height: 46.9167px;">**✔**</td></tr></tbody></table>

</details>### Layer level access

As of 2026.1 access can be granted on the layer-level. Access on this level overrides project-level access, <span style="text-decoration: underline;">but only for the specific layer</span>. All other layers in the project continue to follow the user’s project-level access, unless layer-level access has also been configured for those layers.

Layer-level access can be used to restrict access, for example by limiting who can see a layer, or, for example, to elevate access by allowing specific users or groups to modify or manage a layer. Layer-level access **does not** determine who can create a new layer; this is controlled by project-level access.

<p class="callout success">When using layer-level access Periplus highly recommends setting up user groups, specifically for administrators</p>

<details id="bkmrk-how-to-set-access-at"><summary>How to set access at the layer level?</summary>

**For an existing layer**:

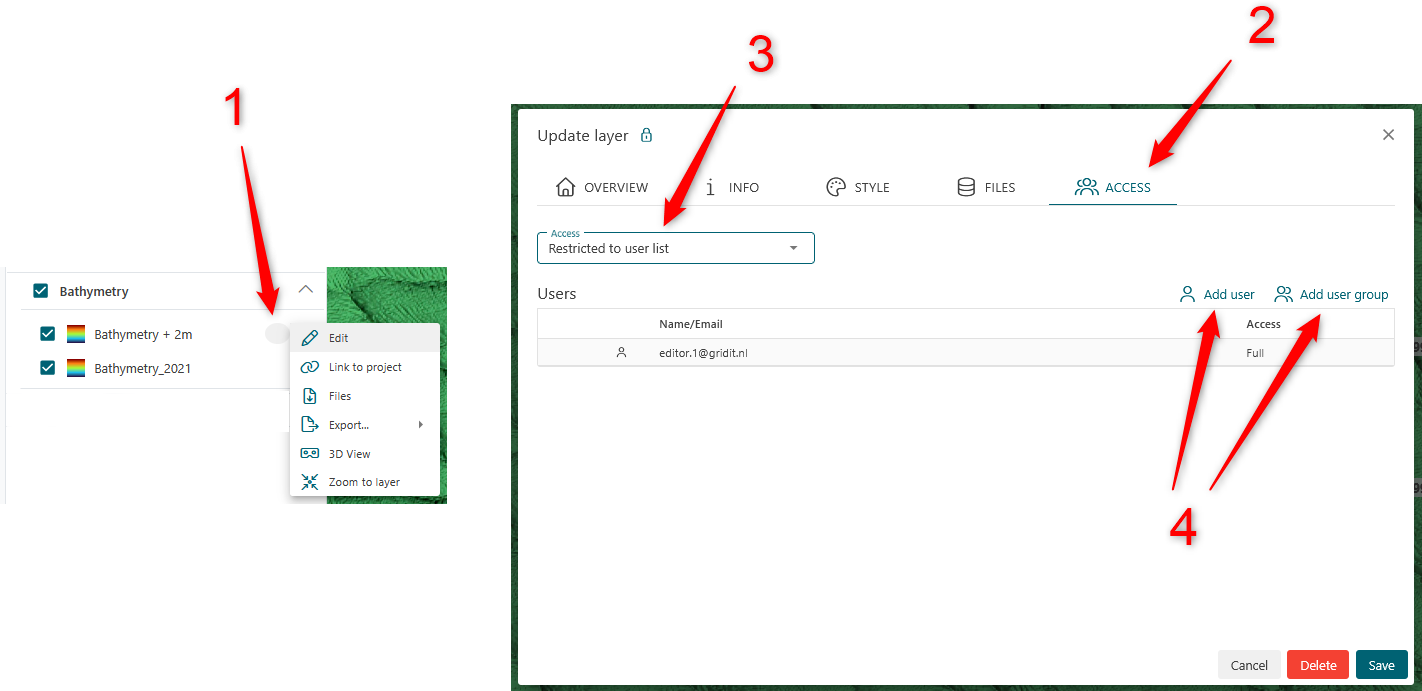
1. In the later tree, on the desired layer select (...) and then edit
2. Select the access tab
3. Add a user or group (we recommend using groups)
4. Set desired access level
5. Once set, a padlock icon will appear on the layer

[![Layer access tab.png](https://wiki.app.gridit.nl/uploads/images/gallery/2026-04/scaled-1680-/layer-access-tab.png)](https://wiki.app.gridit.nl/uploads/images/gallery/2026-04/layer-access-tab.png)
**For a new layer:**

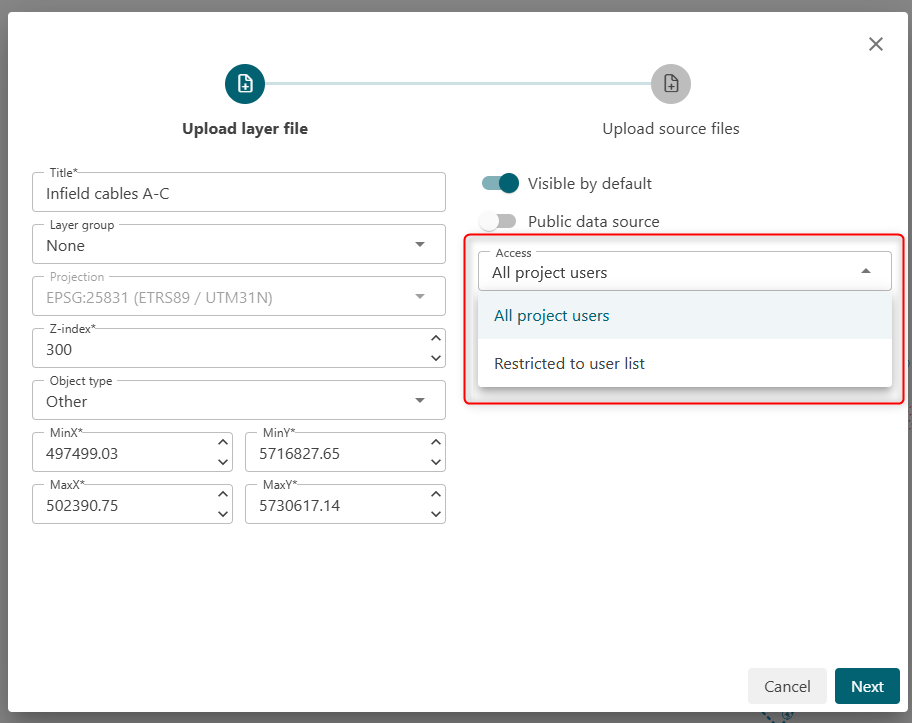
When importing a file, use the access dropdown box as pictured below.

[![add-a-layer-upload-file-3.png](https://wiki.app.gridit.nl/uploads/images/gallery/2026-04/scaled-1680-/add-a-layer-upload-file-3.png)](https://wiki.app.gridit.nl/uploads/images/gallery/2026-04/add-a-layer-upload-file-3.png)
</details><p class="callout info"><span style="color: rgb(0, 0, 0);">It's recommended to create a user group and assign full access to that group each time you create a layer (rather then a specific user). Even a group with a single user reduces your chances of locking users out. A user group can only be created by an organization admin.</span></p>

**<span style="color: rgb(0, 0, 0);">Layer Access Levels:</span>**

<table border="1" id="bkmrk-access-what-does-thi" style="border-collapse: collapse; width: 100%;"><colgroup><col style="width: 15.1329%;"></col><col style="width: 84.8274%;"></col></colgroup><thead><tr><td class="align-center">**Access**</td><td class="align-center">**What does this access allow?**</td></tr></thead><tbody><tr><td>**Outline-only**</td><td>User can only see:

- <span style="color: rgb(68, 68, 68);">The layer outline (bounding box)</span>
- <span style="color: rgb(68, 68, 68);">The layer name</span>
- <span style="color: rgb(68, 68, 68);">The layer information + the email address of all users with full access to the layer (so access can be requested)</span>

User cannot view the layer, only the outline of it.

</td></tr><tr><td>**Read-only**</td><td>User can:

- <span style="color: rgb(68, 68, 68);">View the layer</span>
- <span style="color: rgb(68, 68, 68);">View layer properties</span>
- <span style="color: rgb(68, 68, 68);">Download archived file &amp; Export the layer</span>

</td></tr><tr><td>**Edit**</td><td><span style="color: rgb(68, 68, 68);">User can:</span>

- <span style="color: rgb(68, 68, 68);">View the layer</span>
- <span style="color: rgb(68, 68, 68);">Edit layer properties</span>
- <span style="color: rgb(68, 68, 68);">Edit layer styling</span>
- <span style="color: rgb(68, 68, 68);">Download archived file &amp; Export the layer</span>
- <span style="color: rgb(68, 68, 68);">Replace the layer files (inc. delete the layer files)</span>

</td></tr><tr><td>**Full**</td><td>User can:

- <span style="color: rgb(68, 68, 68);">View the layer</span>
- <span style="color: rgb(68, 68, 68);">Edit layer properties</span>
- <span style="color: rgb(68, 68, 68);">Edit layer styling</span>
- <span style="color: rgb(68, 68, 68);">Download archived file &amp; Export the layer</span>
- <span style="color: rgb(68, 68, 68);">Replace the layer files (inc. delete the layer files)</span>
- <span style="color: rgb(68, 68, 68);">Assign access to the layer</span>

</td></tr></tbody></table>

<details id="bkmrk-how-does-layer-level"><summary>How does layer level access override project level access?</summary>

Here is an example to illustrate how access works:

[![layer level access - project vs layer example.png](https://wiki.app.gridit.nl/uploads/images/gallery/2026-04/scaled-1680-/layer-level-access-project-vs-layer-example.png)](https://wiki.app.gridit.nl/uploads/images/gallery/2026-04/layer-level-access-project-vs-layer-example.png)
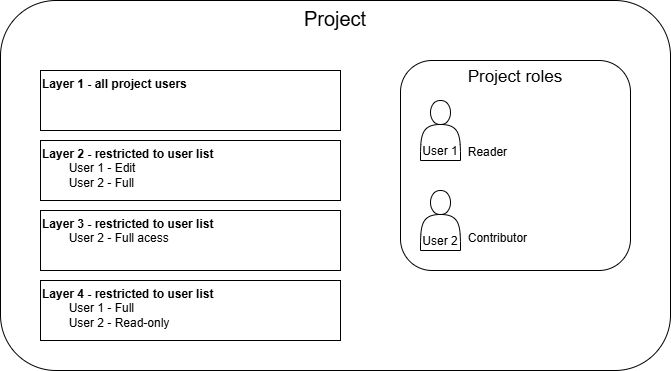
<span style="text-decoration: underline;">User 1 access:</span>

- Cannot add a new layer because their project role is Reader
- Layer 1: Read-only access (as defined in project role)
- Layer 2: Has edit access (because this is specified on the layer-level)
- Layer 3: Has no access (layer-level access overrides project role for this layer - user is not specified)
- Layer 4: Has full access (because this is specified on the layer-level)

<span style="text-decoration: underline;">User 2 access:</span>

- Can add a new layer because their project role is Contributor
- Layer 1: Full access (as defined in project role)
- Layer 2: Has full access (because this is specified on the layer-level)
- Layer 3: Has full access (because they are not specified in layer-level)
- Layer 4: Has read-only access (layer-level access overrides project role for this layer)

</details><details id="bkmrk-outline-only-access-"><summary>Outline-only access</summary>

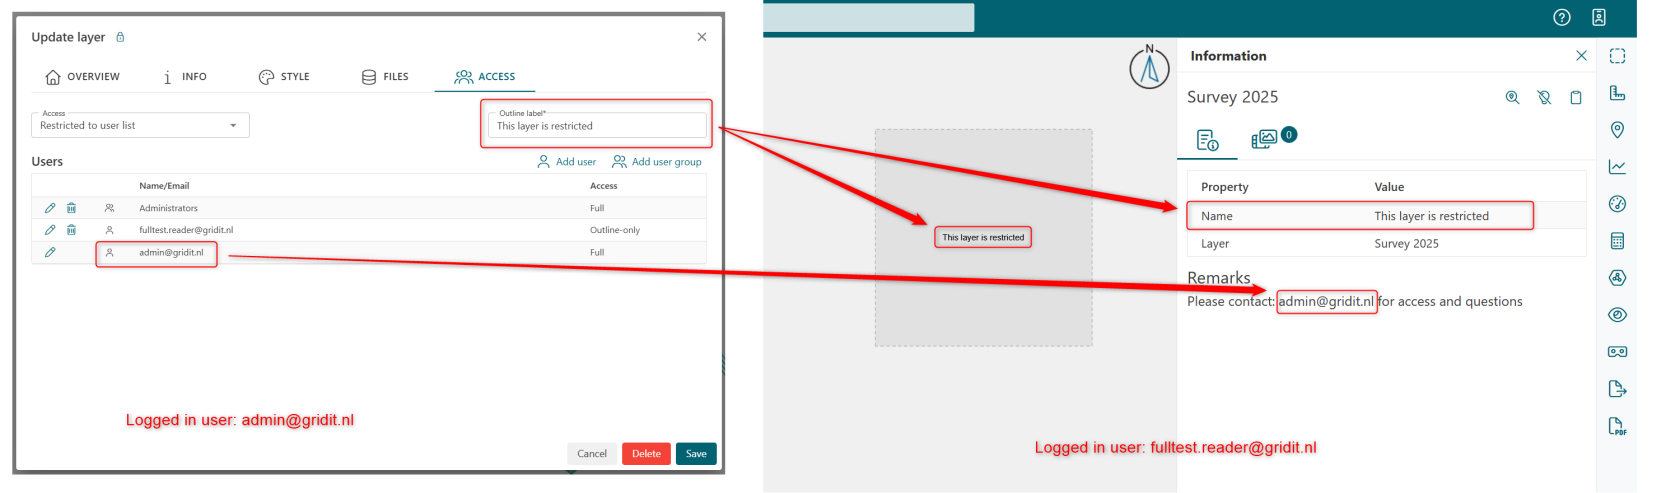
When providing outline-only access, user will be able to:

1. See the outline label.
2. See the Layer name.
3. See the email address for all user who have full access to the layer.
4. Information text in the Layer Properties.

This information is required for a user to know what the layer is and who to contact.

[![outline-explanation2.png](https://wiki.app.gridit.nl/uploads/images/gallery/2026-03/scaled-1680-/outline-explanation2.png)](https://wiki.app.gridit.nl/uploads/images/gallery/2026-03/outline-explanation2.png)
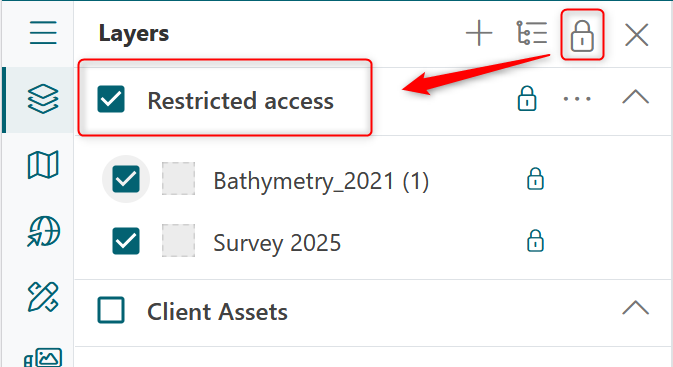
User can access layer they have outline-only access to at the top of the layer tree:

[![user-layer-tree-option.png](https://wiki.app.gridit.nl/uploads/images/gallery/2026-03/scaled-1680-/user-layer-tree-option.png)](https://wiki.app.gridit.nl/uploads/images/gallery/2026-03/user-layer-tree-option.png)
</details><details id="bkmrk-what-if-my-user%27s-lo"><summary>What if my users lock themselves of a layer?</summary>

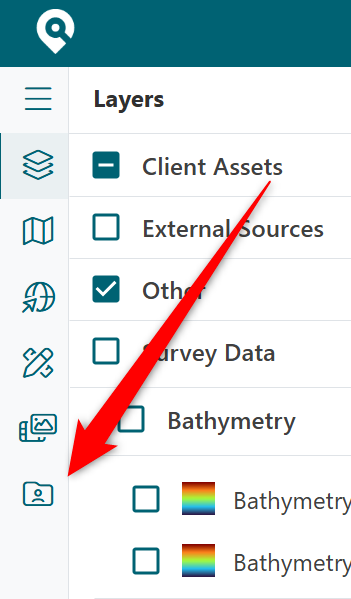
An user with project administrator role can access any restricted layers and provide access again, first by providing full access to themselves, and then unrestricting the layer.

This can be done via this menu item:

[![recovery.png](https://wiki.app.gridit.nl/uploads/images/gallery/2026-04/scaled-1680-/recovery.png)](https://wiki.app.gridit.nl/uploads/images/gallery/2026-04/recovery.png)
</details>## Periplus Access

---

Limited Periplus employees also use GRID*it* for administration and support purposes. In some cases they add layers to projects and or look at existing layers for support purposes. If you have layer-level access enabled then you will first need to contact <support@gridit.nl> and then provide us access.

## FAQ

---

<details id="bkmrk-project-level-access-1"><summary>How to grant access to all layer in a project? (default)</summary>

In most cases you will want all users to have access to all layers in a project which is why this is the default. You can set project-level access in your organization's page. A detailed explanation is available User roles (above).

</details><details id="bkmrk-restricted-project-a"><summary>How to restricted project access (start from zero access)</summary>

In some cases you will want to start from a point of no access for any users. To achieve this you should use groups (but it's not required).

1. Create a user group you want to restrict (organization administrator must do this)
2. Add all users (that you would like to restrict) to this user group (organization administrator must do this)
3. Each time a layer is created restrict access (by only allowing access to the author)
4. After layer is added, set specific access as to the layer, per group, as required (or per user) 
    - Access to existing layers can also be restricted at any time but it's advised to think about access when the layer is created

<p class="callout warning">If you already have layers created before you created the groups be sure to update the access to them.</p>

<p class="callout warning">In this scenario using groups will greatly reduce management of access.</p>

<p class="callout warning">Users that import data should be aware of your company's access policy.</p>

</details><details id="bkmrk-how-can-a-user-add-a"><summary>Who can create a layer for other project users to see?</summary>

The user needs to be given a project-level role (contributor). Every layer a contributor adds is visible to all other project users unless they set restrictions.

Users who have a project role of reader can create layers, but only they can view them.

</details><details id="bkmrk-faq-what-if-a-user-i"><summary>What if a user is assigned access via a group and individually?</summary>

If a user is a member of a group that has been assigned access to a layer AND they have been assigned access to a layer then the user will have the highest level of access to the layer. This goes the same for a user that is assigned to two groups, whichever group has the highest access will be granted to the user. For example, if a group is given outline-only access and a member of that group is given edit access, then the user will be able to edit the layer.

</details><details id="bkmrk-what-if-my-users-loc"><summary>What if my users lock themselves out of a layer?</summary>

An user with project administrator role can access any restricted layers and provide access again, first by providing full access to themselves, and then unrestricting the layer.

This can be done via this menu item:

[![recovery.png](https://wiki.app.gridit.nl/uploads/images/gallery/2026-04/scaled-1680-/recovery.png)](https://wiki.app.gridit.nl/uploads/images/gallery/2026-04/recovery.png)


</details><div id="bkmrk-info-on-outline-only"></div>